Showing posts with label windows. Show all posts

How to prevent pc to lock without admin permission

Hello All, Today I am going to discuss a very general problem which normally faced by IT employee or who belong to software fields. 
Auto system lock on inactivity: Now you might think how the auto-lock feature can be a problem but let me tell you for IT person or specifically automation tester he should take a screenshot while executing his script using any tool like selenium or UFT,
In the meantime, if he wants to go for a time break it's quite challenging for him because IT support doesn’t allow him to change a system setting
So if you are a person who is using their own system where you have full admin access so my friend you are in the wrong place just change your system property no need to put this much mind here but for those who is working in a reputed organization where admin access is restricted by IT team just follow simple below steps 
Note: - This method will only work on a window-based system.

Step 1: - Open Run application using windows shortcut (window+R) or using the start menu, then enter notepad in the run input box and hit the enter button.

Step 2: -Copy the mentioned code and past it to a Notepad file.

set wscrpt = CreateObject("WScript.Shell")
Do
WScript.Sleep (10*1000) 
wsc.SendKeys ("{SCROLLLOCK 2}") 'Use Send Keys to press the keyboard control.
Loop  ' End Loop

Step 3: - Now save this file with ‘name.vbs’ extension, as followed in the below screenshot.

Well, that’s all you successfully created your auto keyboard action program, now whenever you want to go for a break just double click on created VBS file and the auto key function will work for you.

Trick to create folder or file without name


Create folder or file without name 


              So you want to create a file or folder that not content any name well that trick will allow you to create files and folders without any name. This trick is so simple and easy to perform any one can do it just follow the following simple step.


Step1- First create any file or folder or select any file or folder whom you want to assign name.


Step2-Right click on it, select ‘Rename’ or simply press ‘F2’


Step3- Now the main part of this trick comes, press and hold the alt key and while holding alt key type numbers 0160 from the numpad
                                    Or
Press and hold the alt key and while holding alt key press 9 from numeric keypad 8 time
Note: To perform this pc trick it is important to note that number should be typed from numpad and not from number keys present above character keys. 


That’s all ,nameless folder is created but if you want to create another nameless file or folder in the same directory so you will have to rename the file with repeat this trick two or more times.
Release the 'Alt' key. Now without doing anything else, again hold 'Alt' key and do it again.Repeat it to create as many nameless files or folders in the same directory.


How to block unwanted websites in Google Chrome

I know there are many reason why you need to know that how to block a websites. Some common reasons are you have been targeted by spammers who use adware and popup to attack your system. And other reasons may be prevent your friends or relative from having access to certain site content such as social networking site’s like Facebook, Twitter or porn site.


                                                                                                                           Anyway there are many tools for blocking website’s in chrome you can easily find it by using this link.


But  in this all extension's my favorite  is NANNY. To install it click on link you will see Google Chrome web store with some extension .Find Nanny for Google chrome and click to “ADD TO CHROME” button as shown in screenshot(for zoom click on image)

                                                                                           When you click on ADD TO CHROME button a popup window will appears click to install.(for zoom click on image)


With in a few second Google nanny will be installed and its icon will be display in right top ,Right click on it and go to option .

Then new tab will be open on your browser hear you add site name (eg. Facebook…) or site url (xyz.com) and block time(eg. 0900-1700,1900-2100 to block during 9AM-5PM and 7PM-9PM) and max time(eg. 60 min) and then save url as shown in screenshot.
                                                                   
                                                                      (for zoom click on image)

Last but most important step is go to  LockDown select site name at CONFIGURE LOCKDOWN put Duration (eg. 24 hours and 55 minute) and click on Begin LockDown .


That’s it you have don’it  and to remove blocking on websites just go to edit in Blocked URLs but its work after blockset is over but no need to wary for any problem just uninstall and re-install it 


How to disable “Microsoft error reporting“ dialog box when system error occurs in xp

Most of people know about system error and when it’s occursin XP, a little dialog box appears asking if you want to report the error toMicrosoft. Click the message box to make it disappear as shown screenshot so this post is basically that how to turn it off i mean Microsoft windows error message.


Just follow this simple step to hide this error report

* Right-click to My Computer iconand choose Properties.


* Click the Advanced tab onyour System Properties dialog box.
click for zoom


* Click the Error Reportingbutton on the Advanced tab.
click for zoom


* Place a check mark next to "Disableerror reporting."
click for zoom


* Leave the other radio buttonunchecked next to the text labeled, "But notify me when critical errorsoccur." And then click ok that’sall...


Trick to enabled num lock automatically when ever you start your pc


Lots of people don’t know about this that they can manage the “NUM LOCK” key  for each user and  set it enable or disable when user logon. NUM LOCK status is disable by default and if you want your NUM LOCK key is enable automatically. You need to edit the registry of your computer to change this status enabled .To do it

Just follow the given simple steps.


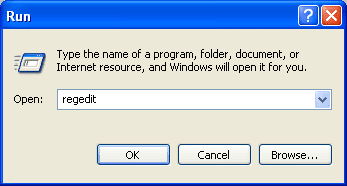
        Ø  Click Start button and go to run (or use window+R shortcut key) then type regedit in Run option then press Enter for next as shown in screenshot
click for zoom


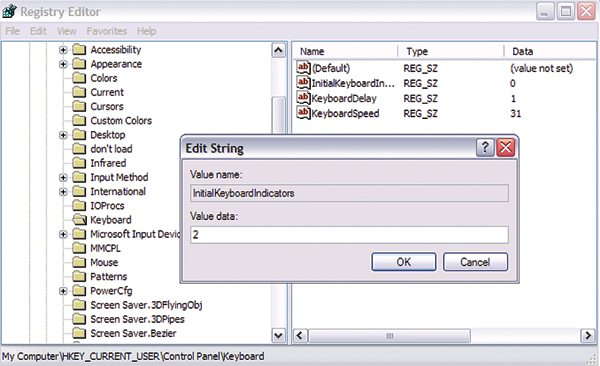
       Ã˜  Here locate the location go to:
                     HKEY_USERS\.Default\Control Panel\Keyboard 
                                                           click for zoom


          Ø Here in right side panel, double click on the value InitialKeyboardIndicators then change its value data from 0 to 2.
click for zoom


           Ã˜ Now close the registry editor and restart your computer after any changes to go into effect.that's all

Trick to Operate or run Mouse Pointer Without using Mouse.

                                                    I know right now this trick is not a such important for you because using your mouse to move mouse pointer is 100 time better then using this trick, but if your mouse does not work what will you do, so hear a solution.


Left Alt + Left Shift + Num Lock  + Ok
as shown in screenshot then 


                               with the help of Numeric Keypad operate mouse simply press and hold the following Keys 

7   8    9

4        6

1   2    3


For Normal Click or enter Press 5

press this for default setting again

Left Alt + Left Shift + Num Lock 


How to create shutdown computer shortcut


Do you have Ever calculate how many clicks required to shutdown your Microsoft Windows? If not so calculate now
(Start > Turn Off computer.. > Turn Off).
Well I have faster and simple way to shutdown my computer. by creating shortcut on windows desktop.
Create shutdown computer shortcut
Right click on any blank space of windows desktop -> New-> Shortcut. A “Create Shortcut” window will open.


In the blank, type in:
shutdown.exe -s -t 0


It means, shutdown and wait for Zero second. Click “Next” button for next step.
Type in whatever name you like in the blank. I use“Shutdown”. Then, click “Finish” button.
You are done. A new shutdown shortcut is on your windows desktop.
I know , it is not a shutdown icon like yours!
Because by default, the shortcut use a “unknown application” icon.We can change it, of course.
Right click on the Shutdown shortcut icon, click“Properties” click “Change icon…”. It will popup an alert, ignore it byclicking “Ok” button. You will get a list of icons to choose from:


Spot the Shutdown icon? Select it and click “OK” button . Done.
Now, only need one click to shutdown computer.

Remove recycle bin:-how to remove recycle bin from desktop.


If you are one of those Windows users who prefer a clean looking desktop like me, then you may be thinking of removing the Recycle Bin icon from the desktop. After you remove the Recycle Bin icon from the Desktop, it looks cleaner and slick. You can remove the Recycle Bin icon from the desktop easily within 1 minis using the this trick. Follow this simple step's to remove recycle bin on desktop .
_______________________________________________________________________________
Step 1
Go to run
Press the key combination Windows logo key + R or simple go to “start and than hit on run” to open the Run dialog.
_______________________________________________________________________________

Step2
Type gpedit.msc in the Run dialog and press Enter. This would start the Local Group Policy Editor.
_______________________________________________________________________________
Step3
In the Local Group Policy Editor, navigate to User Configuration → Administrative Templates → Desktop.
Scroll down the list on the right side pane and find Remove Recycle Bin icon from desktop.
_______________________________________________________________________________
Step4
Double-click on Remove Recycle Bin icon from desktop and choose Enabled.


Click OK to save the settings.
Don it…..


_______________________________________________________________________________

Multi Login :-Login your multiple Account’s in any website like Facebook, Twitter, Gmail by using single browser


 If you have two  or more account’s of any website such as gmail ,facebook ,twitter or hotmail and you would like to be able to see your profile on both, without needing to log out from one, to log in to another.
So there a trick, You can open as many accounts as you want, on the same site, all at once.
The same applies to all membership websites. You can access multiple accounts at the same time, on Facebook, Twitter, MySpace, Hotmail… whatever.
I  knew what in your mind because you  doing this by using different browsers (Firefox, Chrome, IE…), and keeping them running all at once. But that just eats up your RAM memory, and makes your desktop slow . So  we’re not going to use that useless method.
I have 3 method for doing it, each for different browser .Well  this all depends on which browser you want to use. You will see all three covered here, step by step, as always.


Google Chrome


  • Use Google Chrome To Login With Multiple Accounts On Same Site


This one is a well known feature of Google Chrome, but in case you did not know about it…Google Chrome comes with the “Incognito mode”, also known as “Private mode”,  which allows you to login to two different instances of the same website.
1. Login to desired website in Google Chrome.
2. Click on the Tools icon (top right corner at google chrome ) and in the menu, select “New Incognito Window“. Or even easier method is to use a keyboard shortcut. Press  Ctrl+Shift+N  to open a new Incognito Window.
3. Go to the same website and you should now be able to login with another user account.
SCREENSHOT'S


_____________________________________________________________________________________

Firefox


  • Use Firefox To Login With Multiple Accounts On Same Site

Firefox is famous for its extensions and add-ons, so you just need to install a Firefox add-on which will help you do this.
Click to Install CookiePie Firefox Extension (Firefox users only)
It’s fairly easy to use. After you’ve installed it and restarted Firefox, just login to Twitter (for example). Then open a new tab and right click on it. Then find the “Toggle On/Off CookiePie” option and click on it to start the extension.
You can see that a cookie appeared on the right side of the tab, which means you can type-in Twitter url, and then Twitter will ask you to login again. But this time you can do it with different account. The image below explains it all.

SCREENSHOT'S


Couple of things to consider when using CookiePie Firefox extension:
Gmail doe’s not  support this extension,it has recently implemented tougher security to its service, so it is aware about other connections in other tabs or windows. Which means this extension, unfortunately, won’t work when using Gmail. Huge disappointment, I know. But developers of the CookiePie are trying to fix this.
- It also runs on Flock/GNU IceWeasel.


_______________________________________________________________________________

Internet Explorer 8


  • Use Internet Explorer 8 To Login With Multiple Accounts On Same Website

This is also one of the features that is only available in Internet Explorer 8.
IE 8 is packed with a “New Session” mode that allows you to start a new window with a brand new session.
1. Open IE8, go to desired website and login with your first account.
2. Then Go to File –> New Session. This will open a new window. Navigate to the same site and you should be able to login with your other account.
I wouldn’t go for this method, since it’s almost same as if you opened two different browsers and logged in to your accounts. Because IE 8 will also open a new window…
SCREENSHOT'S

I hope you like it.  (-_-)


_____________________________________________________________________________________

Download free DuplicateFinder:-Find and delete all duplicated file on your system


This post is about an  important software that help you to retrieve your hard disk space by deleting its duplicated file .i am telling it important because  , when I ran this free software, during 2 minutes it found 1038 duplicate files on my system totaling 20 GBs. What a surprise! Imagine then how many duplicate files you have if you don’t pay much attention to organizing files on your PC?
Main work of this software is to removing duplicate files from your PC will boost your system performance and speed it up immensely. Whether it be photos, mp3 files, text documents,movies etc. Removing those files will enable you to have more disk space, reduce antivirus scan time, reduce the time it takes to defragment your hard drive and help you easily organize your files.
“DuplicateFinder “  its name is a freeware program that will detect all the cloned files that you might have on your computer.
Its  uses optimized detection algorithms and file filters so the scanning time is greatly minimized. The detected files can be removed in no time with the help of the automatic file selector and the predefined set of actions (copying, moving or deleting).


I must say it was pretty fast and efficient. Now I have additional 20 Gigabytes of space available when I cleaned up the unnecessary files in just 2minutes. Of course, if you don’t want to delete them right away, you can always group them into a folder using “Move” option, and there you can see whether you want to keep some of them.

It works on Windows NT 4.0, 2K, XP, Vista, and Windows 7.

System requirements

  1. 233 MHz processor (or better)
  2. 64 MB RAM
  3. 4 MB of free Hard-Disk space
  4. Operating system: Windows(TM) NT 4.0, 2K, XP, Vista, 7 (32bit)
  5. Microsoft Internet Explorer 5.0 or higher


To download this software click hear(1.2MB)


Subscribe by entering your email and get new updates in your inbox directly


2800 Email subscribers